You already know the importance of communication between a business and a customer. It’s still THE thing that decides whether customers will do business with you or not. And, as we all know, one of the best platforms to engage with customers is WhatsApp. So, knowing how to add a WhatsApp button to your Facebook Page can improve your business communication.
If you are a business owner who already has an established business and a strong online presence, you must already be using Facebook to generate leads for your business.
But are there times when you would rather redirect your leads to WhatsApp and not Facebook Messenger when they try to contact you via your Facebook Page?
If yes, then stick around to find out how you can add a WhatsApp button on your Facebook Page and redirect leads to your WhatsApp.
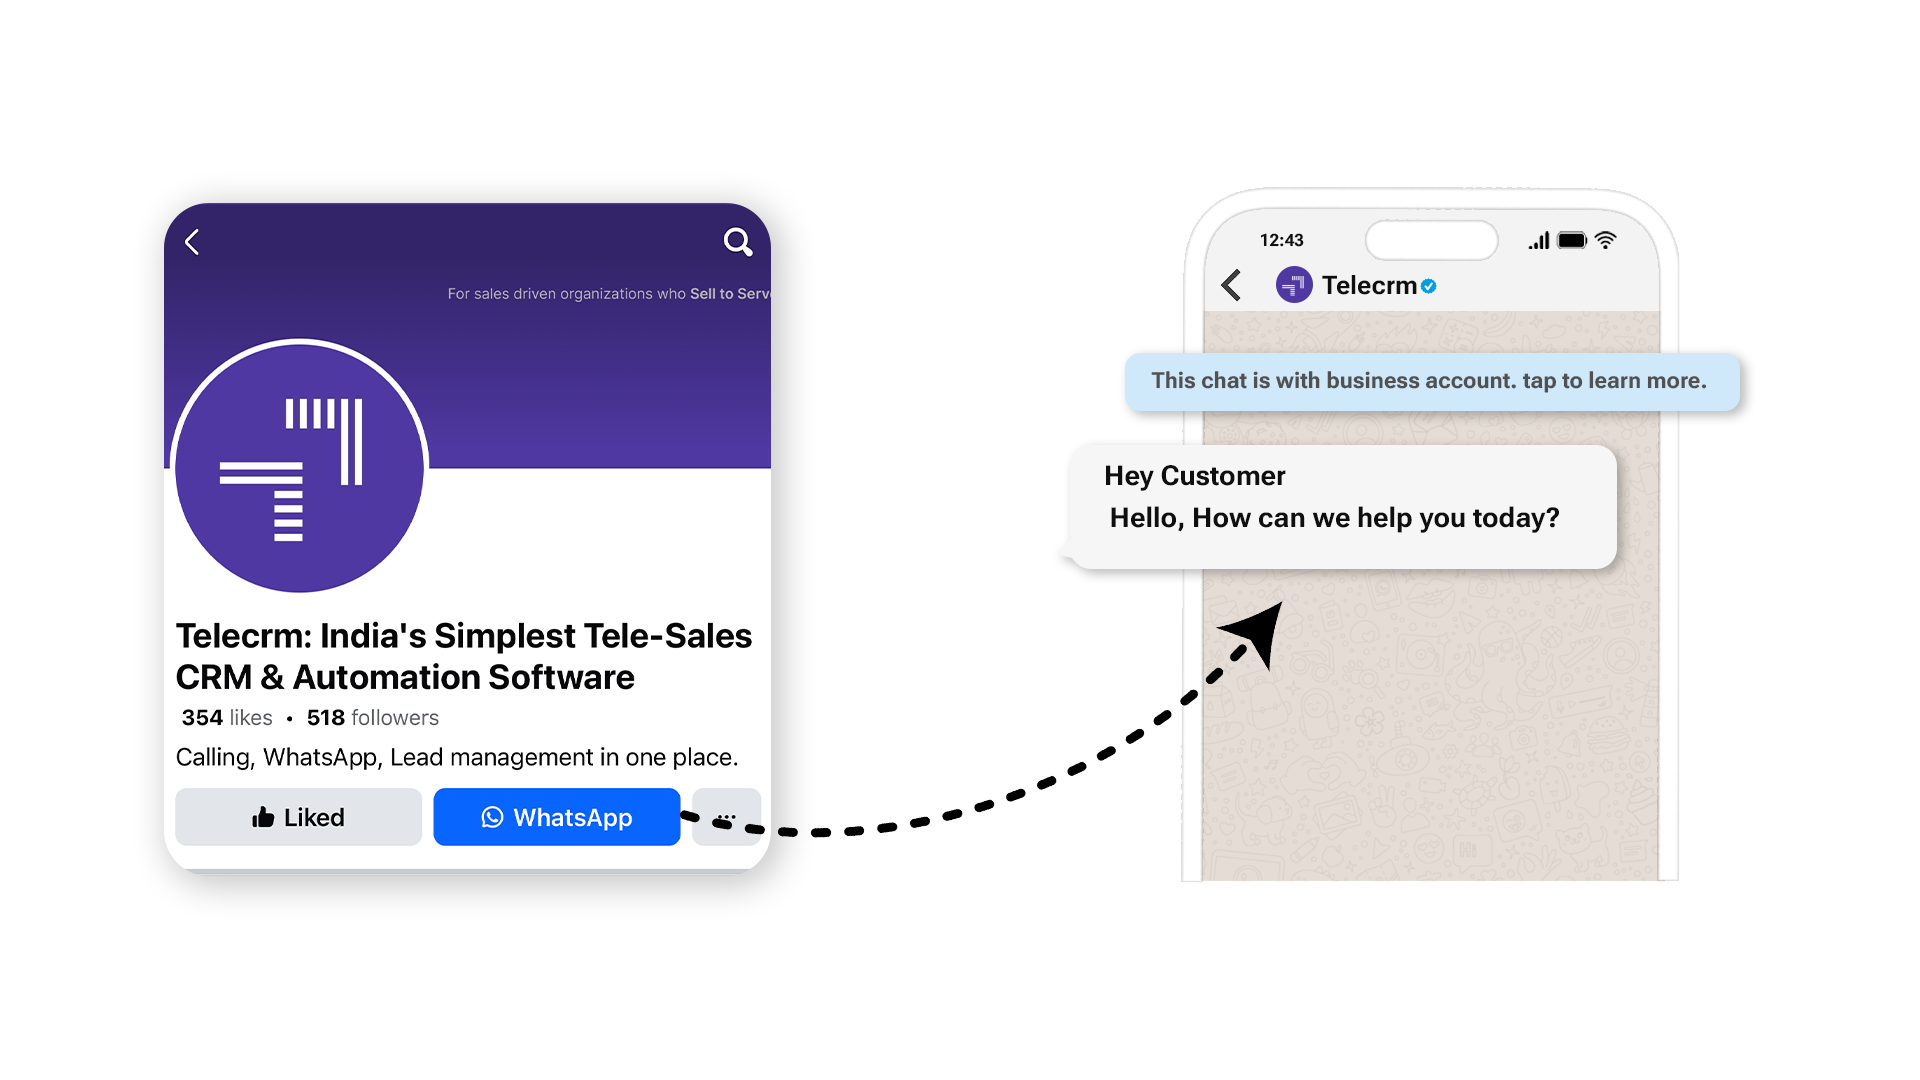
A WhatsApp button on a Facebook business Page allows that business to create a direct communication link between its Facebook Page and WhatsApp account. When a visitor clicks on this button, they are redirected to the brand’s WhatsApp channel, allowing them to start a conversation with the business instantly.

Read: WhatsApp Marketing
You need to have these 2 prerequisites before you can add a WhatsApp button to your Facebook Page.
You’ll definitely need a WhatsApp Business account. If you don’t have one, don’t worry! You can download the WhatsApp Business app from Google Play or App Store. Once it’s installed, just follow the simple setup steps. When completed, link your WhatsApp Business app with your business phone number.
Note: If you are using the regular version of the WhatsApp app for business communications and want to switch to the business app without losing data, read our blog titled How to change WhatsApp to a business account.
To make changes to your Facebook Page, like adding a WhatsApp button, you need to be an admin or editor of that page since that’s the only way you will have permission to make changes.
To add a WhatsApp button to your Facebook business Page, you need to follow the sequence of steps mentioned below carefully.
1. Head to your Facebook login page and log into your Facebook business account.
2. Go to your Facebook business Page and do the following:
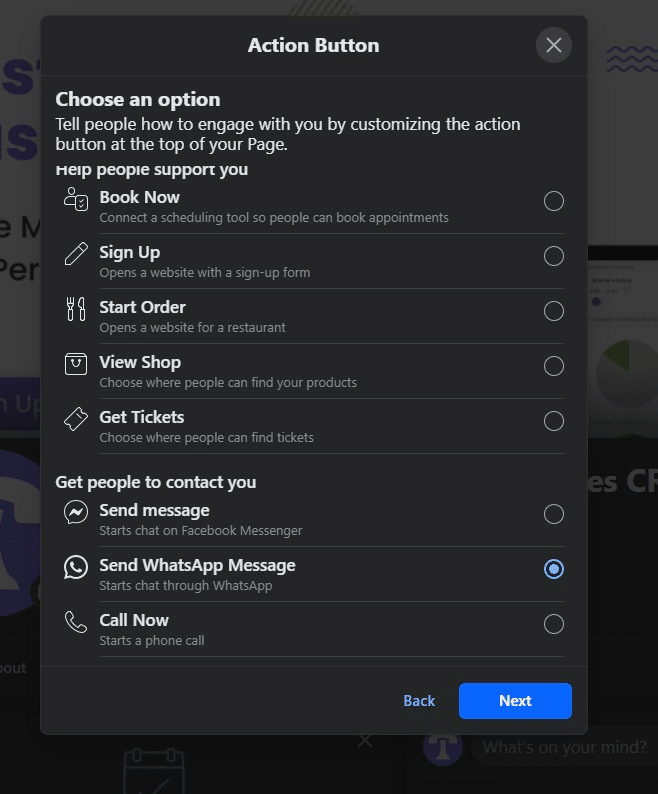
a) Click on the three dots
b) Then click ‘Add Action Button’ from the drop-down menu

3. Now select ‘Send Whatsapp Message‘ from the ‘Get people to contact you’ menu and click Next.
4. Select your country code and enter your WhatsApp Business number. Once done, click on ‘Send code’.
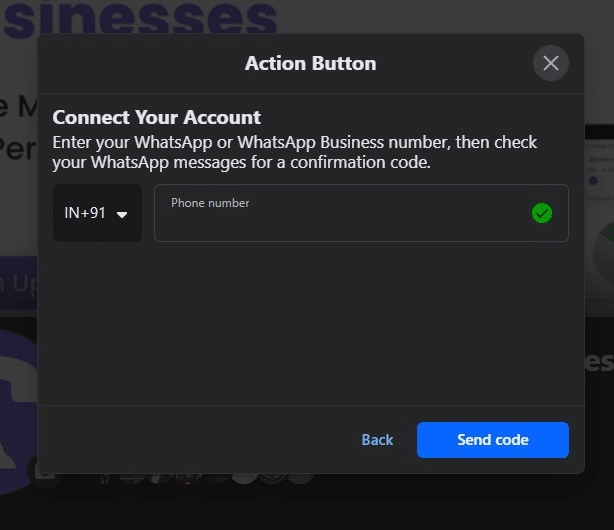
5. Now enter the code you have received on your phone. That’s it. You will see the WhatsApp button on your Facebook page.
Note: If you want people to reach out to your WhatsApp Business API phone number through the WhatsApp Button on your Facebook Page, you have to follow the same process. For clearer directions, read Guide from Meta.
Pro Tip: You can run WhatsApp ads from Facebook Ads Manager. To know more, read our blog on WhatsApp Ads
Adding a WhatsApp button to your Facebook Page is crucial for several reasons:
Instant communication: When you add a WhatsApp button, it means anyone can message you on WhatsApp without having to wait around for emails or phone calls. This quick and easy way of communication helps you stay connected with your audience in real time.
Increased trust: By bringing leads/customers directly to your WhatsApp chat, you can engage with them instantly by sending warm and engaging greeting messages and addressing any issues they may have. This builds trust and credibility because your audience knows you’re just a message away, making them feel more confident about doing business with you.
Potential sales: The easier it is for people to contact you, the more likely they are to become your customers. With just a click on the WhatsApp button from your FB Page, interested prospects can get more information about the product by chatting with your sales agents on WhatsApp, increasing the chances of a purchase and becoming loyal customers.
Also Read: WhatsApp Automation
If you would like to leverage features like automated messages, bulk messaging, chatbots etc. To improve your business communication, then get the WhatsApp API from an official API provider like TeleCRM (India’s best WhatsApp CRM) should be your go-to choice.
This is optional, but it can prove handy if you are planning to scale your business.
Read: Types of WhatsApp
Adding a WhatsApp button is more than just a convenience; it’s a strategic move aimed at building stronger relationships with your customers. It offers instant communication, boosts trust and can potentially increase sales by making it easier for customers to reach out to you.
Don’t miss out on this opportunity to make your business more accessible and appealing to your target audience. With just a few simple steps, you can set up your WhatsApp button and enjoy the benefits of direct and efficient communication with your customers.
Go to Your Facebook Page: Log into Facebook and navigate to the page where you want to add WhatsApp.
Page Settings: Find the ‘Settings’ option at the top of your page.
WhatsApp Tab: Look for a WhatsApp section or tab in the settings menu. The exact location might vary based on updates to Facebook’s interface.
Link Your Number: Enter your WhatsApp business number and follow the prompts to link it to your page.
To add a WhatsApp button to your Facebook page, follow these steps:
Log into your Facebook business account.
Go to your Facebook business Page.
Click on the three dots.
Choose ‘Add Action Button’ from the menu.
Select ‘Send WhatsApp Message’ from the options.
Click Next.
Choose your country code and enter your WhatsApp Business number. Click on ‘Send code’.
Enter the verification code received on your phone.
Now, the WhatsApp button will appear on your Facebook page.
There could be several reasons why you’re unable to add a WhatsApp button on your Facebook page:
Region Restrictions: The feature might not be available in your region.
Page Category: Certain page categories might not support linking with WhatsApp.
Facebook Policies: Facebook’s policies and features are updated regularly. The option might have been removed or modified.
Technical Issues: Sometimes, technical glitches or outdated app versions can cause this issue. Try updating your Facebook app or using a different browser.
Navigate to Your Page: Log into Facebook and go to your business page.
Find the Add Button: Below your page’s cover photo, you’ll see a button that might say “+ Add a Button” if you haven’t added one before, or it will display the current button’s action (like “Call Now” or “Send Message”).
Choose Your Button: Click on “+ Add a Button” or the existing button, then select the type of action button you want to add from the options provided. These options include making a booking, contacting you, making a purchase or donation, downloading an app or game, and more.
Configure the Button: Depending on the button you choose, you’ll be prompted to provide relevant information. For example, if you select “Contact Us,” you’ll need to input a link to your contact page.
Save Your Changes: Once you’ve chosen and configured your button, click “Save” to add it to your page.
To add a WhatsApp button on your Facebook page, ensure you have a WhatsApp Business account and admin access to the Facebook page. Download and set up WhatsApp Business from the app store, and make sure you’re an admin or editor on your Facebook page to add the button.


© Copyright 2025 Telecrm.in - All Rights Reserved • Privacy Policy • T&C


© Copyright 2025 Telecrm.in - All Rights Reserved • Privacy Policy • T&C